A Favorite Tip: Circuit Information Transmission & Hyper Passing
We continue our summer Blogbuster series looking at our next Circuit type, “Hyper Passing.” If you’ve mastered the Wizardry of passing versus disconnectable in your symbol creation, it’s time to become a Jedi. A long time ago, in a Galaxy Far Far Away (May 25th of 1977) moviegoers witnessed the dawn of a cultural icon. Star Wars’ first installment, “A New Hope,” hit the big screen. The film struck a chord, and contained countless memorable scenes of good battling evil, heroes versus villains, and groundbreaking special effects bringing organic undersized rebels against planet-sized tech, all on a Flash Gordon inspired galactic backdrop.
It was the most successful summer blockbuster at the time, surpassing Jaws, and holding its place until E.T. came along in 1982!
One scene that always stuck out to me was the first ever hyperspace jump. The visual impact of seeing stars and galaxies flash by in a linear blur was a new look on an old idea…lightspeed travel.

We are never let into “how” hyperspace works, how it’s calculated to avoid collisions with other systems or ships, where they travel (in a line or in a wormhole-like tube or in some kind of folded space backdrop) but, however it works, it’s a great way of explaining our next Circuit information transmission option: Hyper Passing.
Hyper Passing & A Passing Circuit Type
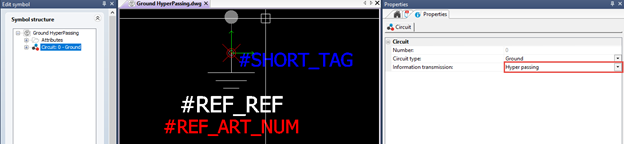
The name Hyper passing just screams Sci Fi, but what is it? By definition (using Help>Search) we see it is an expansion of the behavior of a “Passing” circuit type.
A hyper passing circuit is used when you wish to have the same equipotential wire number on two or more different circuits using components that are linked and have an identical circuit and connection point data (e.g. a busbar distribution block split into segments. Wire does not go through circuits).
Link Wiring Info Between Symbols With No Wires Connected
So, essentially, this makes an invisible instantaneous LINK between symbols on the same component, where the wiring information travels seamlessly between the symbols, even though no wires are connected. It’s like a Hyperspace travel route is set up between the sets of symbols on that component.
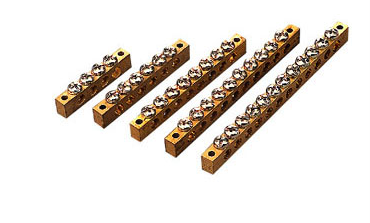
Useful for Grounding Bar or Passing Terminals
So, where would this be useful, having several symbols all invisibly linked without any wired connection? As stated above, the Grounding Bar is the top example, but this is also useful for “passing terminals” where each tap point of terminal carries the circuit info while the symbols themselves are spread throughout your drawings.
By treating your grounding symbols with a Hyper Passing circuit, if you place the symbol anywhere in your drawing and associate it with a named component, it will invisibly “connect” to all other symbols belonging to that component! This ensures a clean wiring diagram (grounds connected invisibly instead of stringing wires all across your drawings) and consistency in their numbering (all share the same equipotential). Now, not to change the trajectory of an entire film franchise, but remember all the Hypdrive troubles of Empire Strikes back? What if SOLIDWORKS Electrical was around “a long time ago” and Han had used its features to lay out his Hyperdrive circuits, mark all of his grounds consistently, and used those tags for a wire label printing machine to trace down the issues?

Would have made all of that failed troubleshooting in Empire Strikes Back…a lot less trouble!
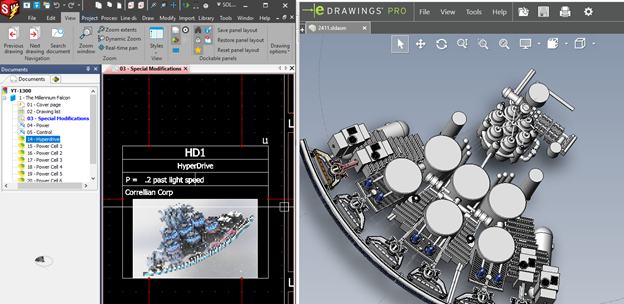
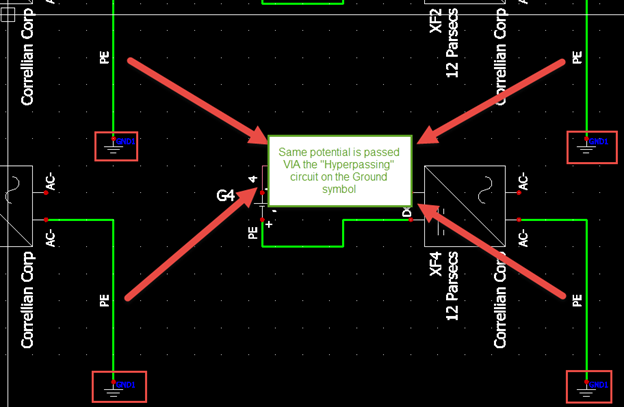
As Han works on his Hyperdrive system layout, he gets to the details in the Schematic Power drawing, ensuring all of his Ground (“PE”) potential is tied together by use of the Hyperpassing Ground symbol. Associating each symbol together (GND1) ensures they are on a shared potential, and share signal information, even though no wiring is drawn between the different symbol placements!
As you realize this new potential power, harness it for good.

Did you like this tutorial? There’s more where this comes from. Find other blogs covering SOLIDWORKS Electrical by Evan or more on our YouTube Tech Tip videos.
Have a question? We’re always available to talk over the phone, for you to leave a message, or for you to submit a request – just contact us.
Share
Meet the Author
view all posts by Evan Stanek
SOLIDWORKS Webinars & Power Hours
